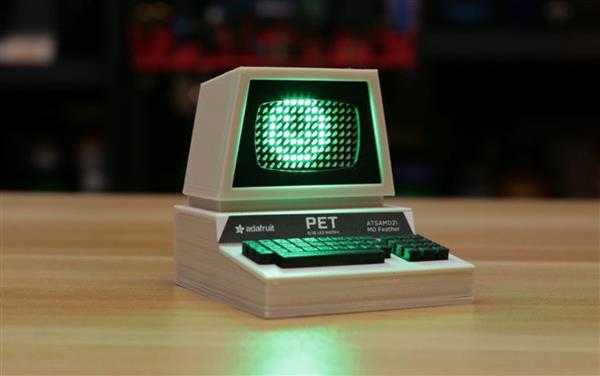
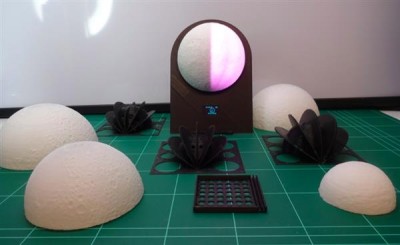
The 3D printing world is packed with examples of working replicas of classic consoles like the Raspberry Pi Gameboy or mini-NES. It now looks as though Adafruit has taken things a generation further back with a LED light-show driven replica of late 70s PC the Commodore PET.
Yet unlike the functional replica examples first mentioned, the PET is mostly an incredibly nifty, customizable LED show and those behind the project realize this. The tutorial creators note that “this isn’t necessarily useful or an actual computer. It’s just a cool prop," before concluding that no matter what it is, you’ll likely gain some experiences if you decide to build one.
And thanks to the incredibly detailed tutorial (as well as its source video below) doing so is completely possible for the committed Maker.
To complete the project, you’ll need soldering skills, an awareness of software manipulation, as well as circuit board, battery and wiring knowledge. Of course, you’ll also need access to a 3D printer to manufacture the 10 3D printed parts necessary to complete the Commodore PET.
Thankfull, the 3D printed STL files are freely available from Thingiverse under a Creative Commons Attribution licence and should be small enough to fit on just about any entry level desktop 3D printer. Adafruit recommends 3D printing using PLA plastic at 220C, a heated bed, 20% infill and 0.2mm per layer. resolution.

Those settings make perfect sense to me. Of course, PLA works great even if you don’t have a heated bed and moving to 0.15mm would look that much slicker if your 3D printer can handle it. And heck, other material options such as ABS would work out fine if you were stocked with the stuff. Also, for those keen on customizing projects like this, the Fusion 360 source file is free to download as well.
I should note that the 3D printing part of the tutorial can probably be seen as the simplest of all the required tasks necessary to make your own Commodore PET. An understanding of the software libraries that run through the Adafruite Feather micro-controller and source code tweaking are needed from a software perspective. Also, additional knowledge of making sense out of circuit board diagrams for soldering on all the proper connections as well as assembly of the 16x9 LED matrix onto the two separate PCBs is needed before any celebration can be had.


From there its a matter of gluing together and mounting the electronics into the previously 3D printed case and voila, you’ve made your own computer!
Fortunately, as is the case with most maker-friendly Adafruit projects, all of the necessary electronic components can be found online through the tutorial itself. An inventory of supplementary tools & supplies list is also available so really all that's holding you back from making your own is, well, there may be a number of reasons I suppose. But if you have the time, expertise and fascination with classic electronics then this might be the perfect project for you.


